Menu
This post is the precursor to “The Dummies Guide to Typing Japanese Letters on Your Windows 7 or 8 PC”.
If you are reading this, you probably have English installed in the Language toolbar of your computer by default.
But you are learning Japanese (why else would you be on this site?) and would like to be able to type Japanese characters with your English keyboard.
If you are scratching your head wondering how to do this, fret not. Installing Japanese input on your Windows PC is easy. Below you will learn how to install Japanese input on your Windows computer with our step-by-step screenshots.
First, know that even though a wide range of input languages (from Arabic to Thai) are included with Windows, you need to add them to your list of languages before you can use them.
In other words, you need to enable Japanese input if you want to be able to type Japanese characters. So how do you do that?
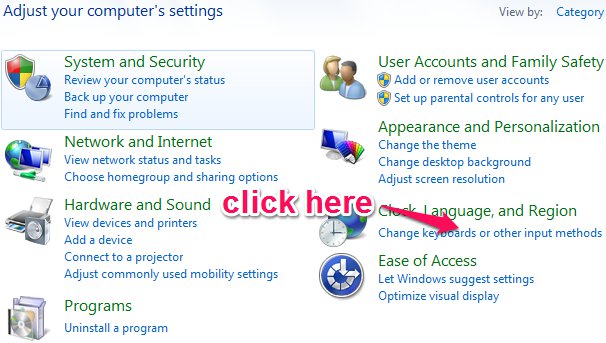
Go to Start menu. Click on Control Panel and you will see this screen. You want to click on Change keyboards or other input methods.
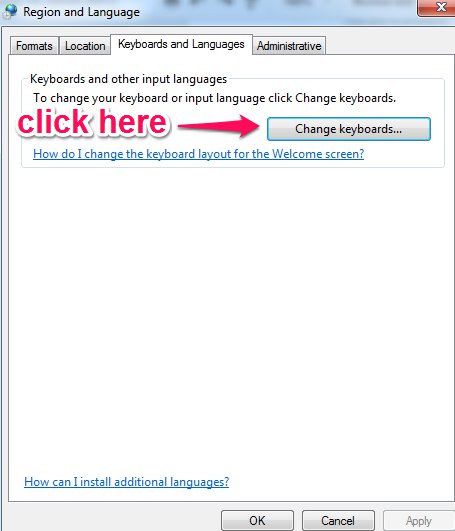
Next, you should see the Keyboards and Languages tab under Region and Language. Here, click on Change keyboards.

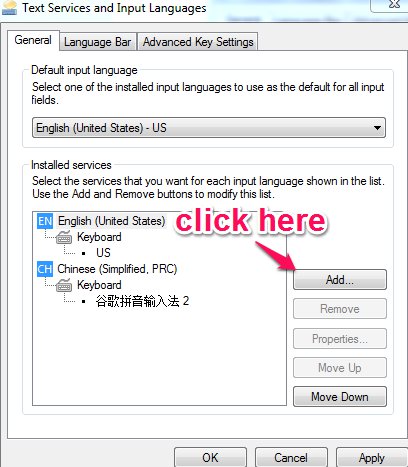
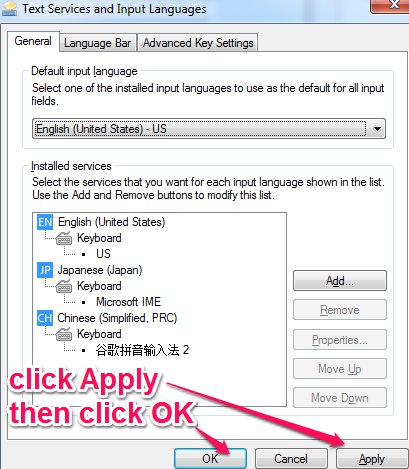
Under Installed services in the General tab, click Add.
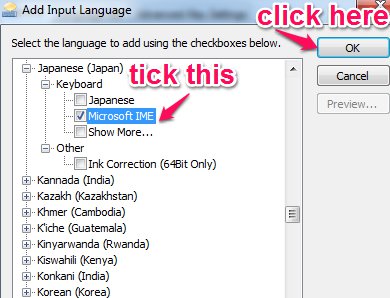
Scroll down and double-click on Japanese. Then double-click on Keyboard, select Microsoft IME (Input Method Editor), and then click OK.
Next, you will see this screen. Click Apply, then click OK and you are done!
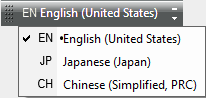
Now, you should be able to see the Language toolbar on your desktop.
When you have more than one language installed on your computer, Windows displays the Language toolbar in the lower-right corner, near your system clock.
The Language toolbar shows the two-letter abbreviation for the language that is currently displayed. And when you click on it, you should see this:

If the Language toolbar is not listed in the Toolbars menu, don’t panic. It just means that you do not have multiple input languages installed on your computer yet.
You can add additional input languages by following our instructions from Step 1 to Step 5 above.
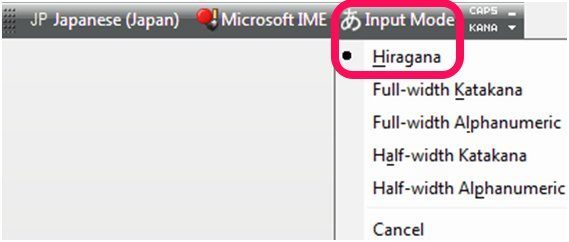
You can change the input language to Japanese from your desktop quickly by using the Language toolbar. Let’s see how to switch to Japanese input with only three mouse clicks:
And now, you are all set and ready to type in Japanese!
Once you are done with typing Japanese characters, how do you switch back to English input? Good news, changing the input language back to English is a piece of cake.
You only need to do two mouse clicks:
For those who frequently switch between languages, you can use the keyboard shortcut Shift + Alt.
I hope this tutorial helped you to install Japanese input on your computer successfully. Now you can play our popular hiragana games and katakana games without any difficulties.
Good luck and ganbatte on your journey to learning Japanese! If you would like to learn how to type and convert Japanese letters, please go to the next articles in this series:
Longevity Diet: The Secrets Behind the Japanese’s Longevity
Say Hello in Japanese the Right Way
The Dummies Guide to Converting Japanese Letters on Your Windows 7 or 8 PC
The Dummies Guide to Typing Japanese Letters on Your Windows 7 or 8 PC
Japanese Alphabet Pronunciation
Japanese Hiragana Alphabet